
📍 개요
github 블로그를 시작하게 되었다. 기존에 tistory 블로그를 운영했는데, 사용할 수 있는 스킨이 제한적이라 자꾸 커스텀 욕구가 올라와서 github으로 이관하게 되었다.
🧷 [tistory blog]https://0nehundred4ndt3n.tistory.com/
막상 쓰려고 github blog를 이것저것 만져본지 한달 정도 되어가는 시점에, 한편으론 매번 md 작성하고 push하는 과정이 귀찮기도 해서 아마 tistory와 github 둘 다 적절히 사용하지 않을까 싶다. ㄴ
📍 How to start Github blog in Window
1. ruby, gem 설치 / Jekyll, Bundler 설치
이미 설치된 경우 아래와 같이 확인 가능하다.
> ruby --version
> gem --version

그렇지 않은 경우 아래 사이트에서 설치마법사를 받아 진행한다. 이 때 중요한 것은, “Add Ruby executables to your PATH” 옵션을 체크해야만 한다. windows 외의 Host PC에서 진행하는 경우, 하기 사이트를 참고한다.
🧷 [ruby 설치마법사] https://rubyinstaller.org/downloads/
🧷 [ruby 설치 가이드 in Windows, mac, Linux] https://wikidocs.net/275696
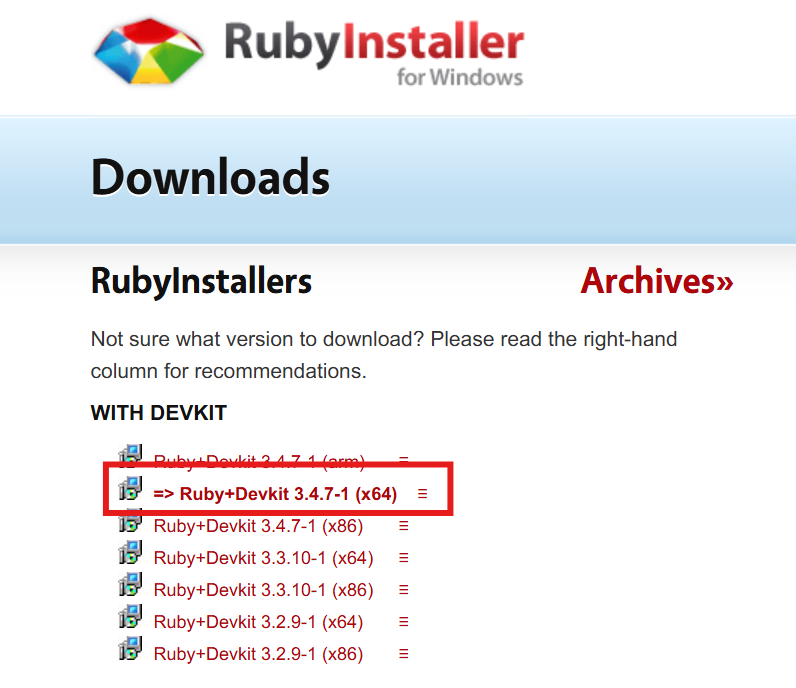
64bit 윈도우의 경우 위 파일 설치
다음을 실행해 Jekyll과 Bundler 를 설치한다. 각각 테마 관리(설치), 의존성(플러그인) 관리+로컬테스트 목적이다.
> gem install jekyll bundler
2. git repository ({site이름}.gihub.io)생성 / 원하는 테마 선택 + git copy / git push
public 옵션을 체크하여 *{site이름}.gihub.io* repository를 생성한다. 그 외 옵션은 크게 중요치 않다.(맘대로)
다음을 실행해 로컬에 git clone을 해준다. clone한 디렉터리(로컬)에서 수정 후→ bundler로 체크한 다음→ 수정사항을 push하면 배포가 되는 식이다.
> git clone https://github.com/...github.io
이제 jekyll theme을 고른다. theme 마다 적용 방법이 대동소이 할 수 있으므로, Readme를 적극적으로 참고할 필요가 있다. 해당 블로그는 아래 첨부된 jeffreytse의 테마를 적용했다.
🧷 [jekyll theme] https://github.com/topics/jekyll-theme
🧷 [jeffereytse’s theme] https://github.com/jeffreytse/jekyll-theme-yat
로컬 테스트 단계는 생략하고 바로 copy로 넘어가도록 하겠다. (Powershell 기준)
> git clone https://github.com/jeffreytse/jekyll-theme-yat.git yat-full
> cd yat-full
yat-full> Copy-Item -Recurse -Force * ..\cityofwonder.github.io\
yat-full> cd ..\cityofwonder.github.io
..github.io> Remove-Item -Recurse -Force ..\yat-full
..github.io> Remove-Item -Recurse -Force backup
덧붙여 해당 테마의 경우 about.markdown, about.html이 모두 있어 일부 정리해주었다. (다 마치고 나니 안하는게 나았을 것 같기도 하다)
..github.io> Remove-Item about.markdown
..github.io> Remove-Item index.markdown
..github.io> Remove-Item .jekyll-cache -Recurse -Force
..github.io> Remove-Item _site -Recurse -Force
이렇게 clone한 디렉터리에 변경사항이 쌓이면, git도 알 수 있도록 push해주어야한다.
git add .
git commit -m "{원하는 커밋 메시지}"
git push origin main
2-1. (error) remote 불일치 / branch 불일치
이 때, main, branch, 변경사항 불일치 등의 여러 이유로 에러가 발생할 수 있다. 에러 메시지를 잘 읽고 해결해야한다. 각각 다음과 같다.
⇒ remote 불일치
*PS C:\Users\jshrb\[cityofwonder.github.io](http://cityofwonder.github.io/)> git push origin main
remote: Permission to jeffreytse/jekyll-theme-yat.git denied to cityofwonder.*
> git remote -v
> git remote set-url origin https://github.com/cityofwonder/cityofwonder.github.io.git
> git push origin main
⇒ branch 불일치
*PS C:\Users\jshrb\[cityofwonder.github.io](http://cityofwonder.github.io/)> git commit -m "Import yat theme and configure blog"
On branch master
Your branch is ahead of 'origin/master' by 1 commit.
(use "git push" to publish your local commits)
nothing to commit, working tree clean*
> git branch -M main
> git push -u origin main --force
3. Live Demo 확인 / 커스텀
성공적으로 push를 하고나면 다음 링크에서 제공하는 Live Demo와 같은 화면을 볼 수 있다.
여기서부터는 각 컴포넌트가 어디에 위치했는지 확인하고 수정하는게 전부이다.
🧷 [Live Demo] https://jeffreytse.github.io/jekyll-theme-yat/
다음은 내가 수행한 몇가지 커스텀이다.
-
en, kr, jp 폰트 프리텐다드로 통일 / 각 post의 헤드라이너만 Pretendard Extrabold로 수정
_includes/head.html파일 수정:-<link rel="stylesheet" href="https://cdn.jsdelivr.net/npm/typeface-noto-sans@0.0.72/index.min.css"> +<link rel="stylesheet" as="style" crossorigin href="https://cdn.jsdelivr.net/gh/orioncactus/pretendard@v1.3.9/dist/web/static/pretendard.min.css" />_sass/yat.scss파일 수정:-$base-font-family: Helvetica Neue, Helvetica, Arial, sans-serif, !default; +$base-font-family: "Pretendard", -apple-system, BlinkMacSystemFont, system-ui, Roboto, "Helvetica Neue", "Segoe UI", "Apple SD Gothic Neo", "Noto Sans KR", "Malgun Gothic", "Apple Color Emoji", "Segoe UI Emoji", "Segoe UI Symbol", sans-serif !default;/home/user/cityofwonder.github.io/_config.yml, 172 line~
주석 풀고 heading_style, subheading_style을 주면 된다.
banner: video: null # Video banner source loop: true # Video loop volume: 0 # Video volume (100% is 1.0) start_at: 0 # Video start time image: null # Image banner source opacity: 1.0 # Banner opacity (100% is 1.0) background: "rgba(0, 0, 0, 0.8)" # Banner background (Could be a image) height: "640px" # Banner default height min_height: null # Banner minimum height heading_style: 'font-family: "Pretendard", sans-serif; font-weight: 800' # Pretendard ExtraBold for heading subheading_style: 'font-family: "Pretendard", sans-serif; font-weight: 800' # Pretendard ExtraBold for subheading -
기존 포스팅 삭제 및 첫번째 포스팅 작성
로컬에서 아래 실행 후 push 수행 혹은 repo 상에서 직접 지울 수도 있다.
..github.io> rm -f _posts/*.md _posts/*.markdown첫번째 포스팅을 위한 개괄적인 layout은 다음과 같다.
--- layout: post title: "🚩깃허브 블로그를 시작하며" subtitle: "준비된 사람에게 기회가 온다" categories: ["📂/etc"] tags: [일상] banner: image: /assets/images/banners/2025-11-16-1.jpg opacity: 0.8 background: "rgba(0, 0, 0, 0.7)" --- {본문} --- **작성일**: 2025년 11월 16일 -
index 페이지 heading, subheading, banner 수정
/home/user/cityofwonder.github.io/index.html, line 7
하이라이트 된 부분을 추가해주면 된다.
 ---
 # Feel free to add content and custom Front Matter to this file.
 # To modify the layout, see https://jekyllrb.com/docs/themes/#overriding-theme-defaults

 layout: home
 title: Home
 heading: "🚩 CityofWonder's blog"
 subheading: "Computer Science | Pwnable | Reversing | WEB3 | AI"
 banner: "/assets/images/banners/home.jpg"
 ---